In this tutorial we will add Spring Security 3 support to our previous Spring MVC 3 application. We will create a separate but configurable security layer, and authenticate our users using a custom service provider. This is
Part 2 of our Spring Security 3 - MVC Integration Tutorial. If you haven't read part one, make sure to read it first:
Spring Security 3 - MVC Integration Tutorial (Part 1)
What is Spring Security?
Spring Security provides comprehensive security services for J2EE-based enterprise software applications. There is a particular emphasis on supporting projects built using The Spring Framework, which is the leading J2EE solution for enterprise software development. If you're not using Spring for developing enterprise applications, we warmly encourage you to take a closer look at it. Some familiarity with Spring - and in particular dependency injection principles - will help you get up to speed with Spring Security more easily.
Source: http://static.springsource.org/spring-security/site/docs/3.1.x/reference/introduction.html#what-is-acegi-security
Let's start by creating a special controller that handles the
login and
logout requests.
LoginLogoutController
package org.krams.tutorial.controller;

import org.apache.log4j.Logger;
import org.springframework.stereotype.Controller;
import org.springframework.ui.ModelMap;
import org.springframework.web.bind.annotation.RequestMapping;
import org.springframework.web.bind.annotation.RequestMethod;
import org.springframework.web.bind.annotation.RequestParam;

/**
 * Handles and retrieves the login or denied page depending on the URI template
 */
@Controller
@RequestMapping("/auth")
public class LoginLogoutController {

 protected static Logger logger = Logger.getLogger("controller");

 /**
  * Handles and retrieves the login JSP page
  *
  * @return the name of the JSP page
  */
 @RequestMapping(value = "/login", method = RequestMethod.GET)
 public String getLoginPage(@RequestParam(value="error", required=false) boolean error,
   ModelMap model) {
  logger.debug("Received request to show login page");

  // Add an error message to the model if login is unsuccessful
  // The 'error' parameter is set to true based on the when the authentication has failed.
  // We declared this under the authentication-failure-url attribute inside the spring-security.xml
  /* See below:
   <form-login
    login-page="/krams/auth/login"
    authentication-failure-url="/krams/auth/login?error=true"
    default-target-url="/krams/main/common"/>*/
  if (error == true) {
   // Assign an error message
   model.put("error", "You have entered an invalid username or password!");
  } else {
   model.put("error", "");
  }

  // This will resolve to /WEB-INF/jsp/loginpage.jsp
  return "loginpage";
 }

 /**
  * Handles and retrieves the denied JSP page. This is shown whenever a regular user
  * tries to access an admin only page.
  *
  * @return the name of the JSP page
  */
 @RequestMapping(value = "/denied", method = RequestMethod.GET)
  public String getDeniedPage() {
  logger.debug("Received request to show denied page");

  // This will resolve to /WEB-INF/jsp/deniedpage.jsp
  return "deniedpage";
 }
}
This controller declares two mappings:
/auth/login - shows the login page
/auth/denied - shows the denied access page
Each mapping will resolve to a specific JSP page.
Here are the JSP pages:
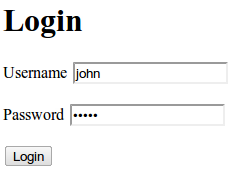
loginpage.jsp
This is a simple HTML form and input elements. If you need a review, please visit the
HTML Forms and Input tutorials from
w3schools. We have two text input elements:
j_username
j_password
These are Spring's placeholder for the
username and
password respectively.
When the form is submitted, it will be sent to the following action URL:
j_spring_security_check
Take note of the EL expression
${error}This is used for displaying invalid credentials during login. The value is derived from the returned model of the controller. See our controller declaration below.
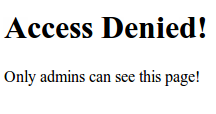
Next we create the access denied page. This page will be displayed if the user is trying to access an unauthorized page. For example, a regular user tries to access an admin only page will get an access denied page.
deniedpage.jsp
Here's how the JSP pages should look like:
loginpage.jsp
 deniedpage.jsp
We've finished the login/logout controller and the associated JSP views. We will now enable Spring Security in our application.
To enable it, we need to the following steps:
1. Add a
DelegatingFilterProxy in the web.xml
2. Declare a custom XML config named
spring-security.xml
In the web.xml we declare an instance of a
DelegatingFilterProxy. This basically filters requests based on the declared url-pattern.
web.xml
Notice the url-patterns for the DelegatingFilterProxy and DispatcherServlet. The Spring Security is placed at the root-path
/*
Whereas, Spring MVC is placed at a sub-path
/krams/*
We also referenced two important XML configuration files:
spring-security.xml
applicationContext.xml
spring-security.xml contains configuration related to Spring Security.
spring-security.xml
<?xml version="1.0" encoding="UTF-8"?>
<beans xmlns="http://www.springframework.org/schema/beans"
 xmlns:xsi="http://www.w3.org/2001/XMLSchema-instance"
    xmlns:security="http://www.springframework.org/schema/security"
 xsi:schemaLocation="http://www.springframework.org/schema/beans
      http://www.springframework.org/schema/beans/spring-beans-3.0.xsd
   http://www.springframework.org/schema/security
   http://www.springframework.org/schema/security/spring-security-3.0.xsd">

 <!-- This is where we configure Spring-Security  -->
 <security:http auto-config="true" use-expressions="true" access-denied-page="/krams/auth/denied" >

  <security:intercept-url pattern="/krams/auth/login" access="permitAll"/>
  <security:intercept-url pattern="/krams/main/admin" access="hasRole('ROLE_ADMIN')"/>
  <security:intercept-url pattern="/krams/main/common" access="hasRole('ROLE_USER')"/>

  <security:form-login
    login-page="/krams/auth/login"
    authentication-failure-url="/krams/auth/login?error=true"
    default-target-url="/krams/main/common"/>

  <security:logout
    invalidate-session="true"
    logout-success-url="/krams/auth/login"
    logout-url="/krams/auth/logout"/>

 </security:http>

 <!-- Declare an authentication-manager to use a custom userDetailsService -->
 <security:authentication-manager>
         <security:authentication-provider user-service-ref="customUserDetailsService">
           <security:password-encoder ref="passwordEncoder"/>
         </security:authentication-provider>
 </security:authentication-manager>

 <!-- Use a Md5 encoder since the user's passwords are stored as Md5 in the database -->
 <bean class="org.springframework.security.authentication.encoding.Md5PasswordEncoder" id="passwordEncoder"/>

 <!-- A custom service where Spring will retrieve users and their corresponding access levels  -->
 <bean id="customUserDetailsService" class="org.krams.tutorial.service.CustomUserDetailsService"/>

</beans>
The elements are self-documenting. If you're using an IDE, like Eclipse or STS, try pointing your mouse to any of these elements and you will see a short description of the element.
Notice that the bulk of the security configuration is inside the
http element. Here's what we observe:
1. We declared the denied page URL in the
access-denied-page="/krams/auth/denied"
2. We provided three URLs with varying permissions. We use
Spring Expression Language (SpEL) to specify the role access. For admin only access we specified
hasRole('ROLE_ADMIN') and for regular users we use
hasRole('ROLE_USER'). To enable SpEL, you need to set
use-expressions to true
3. We declared the login URL
login-page="/krams/auth/login"
4. We declared the login failure URL
authentication-failure-url="/krams/auth/login?error=true"
5. We declared the URL where the user will be redirected if he logs out
logout-success-url="/krams/auth/login"
6. We declared the logout URL
logout-url="/krams/auth/logout"
7. We declared an
authentication-manager that references a custom user-service
8. We declared a custom user-service
9. We also declared an Md5 password encoder:
When a user enters his password, it's plain string. The password we have in our database (in this case, an in-memory lists) is Md5 encoded. In order for Spring to match the passwords, it need's to encode the plain string to Md5. Once it has been encoded, then it can compare passwords.
Let's focus for a moment to the custom user-service.
To allow Spring to use our custom database schema, we need to provide a custom user-service. This service must implement Spring's
UserDetailsService interface.
CustomUserDetailsService
package org.krams.tutorial.service;

import java.util.ArrayList;
import java.util.Collection;
import java.util.List;

import org.apache.log4j.Logger;
import org.krams.tutorial.dao.UserDAO;
import org.krams.tutorial.domain.DbUser;
import org.springframework.dao.DataAccessException;
import org.springframework.security.core.GrantedAuthority;
import org.springframework.security.core.authority.GrantedAuthorityImpl;
import org.springframework.security.core.userdetails.User;
import org.springframework.security.core.userdetails.UserDetails;
import org.springframework.security.core.userdetails.UserDetailsService;
import org.springframework.security.core.userdetails.UsernameNotFoundException;
import org.springframework.transaction.annotation.Transactional;

/**
 * A custom service for retrieving users from a custom datasource, such as a database.
 * <p>
* This custom service must implement Spring's {@link UserDetailsService}
 */
@Transactional(readOnly = true)
public class CustomUserDetailsService implements UserDetailsService {

 protected static Logger logger = Logger.getLogger("service");

 private UserDAO userDAO = new UserDAO();

 /**
  * Retrieves a user record containing the user's credentials and access.
  */
 public UserDetails loadUserByUsername(String username)
   throws UsernameNotFoundException, DataAccessException {

  // Declare a null Spring User
  UserDetails user = null;

  try {

   // Search database for a user that matches the specified username
   // You can provide a custom DAO to access your persistence layer
   // Or use JDBC to access your database
   // DbUser is our custom domain user. This is not the same as Spring's User
   DbUser dbUser = userDAO.searchDatabase(username);

   // Populate the Spring User object with details from the dbUser
   // Here we just pass the username, password, and access level
   // getAuthorities() will translate the access level to the correct role type

   user =  new User(
     dbUser.getUsername(),
     dbUser.getPassword().toLowerCase(),
     true,
     true,
     true,
     true,
     getAuthorities(dbUser.getAccess()) );

  } catch (Exception e) {
   logger.error("Error in retrieving user");
   throw new UsernameNotFoundException("Error in retrieving user");
  }

  // Return user to Spring for processing.
  // Take note we're not the one evaluating whether this user is authenticated or valid
  // We just merely retrieve a user that matches the specified username
  return user;
 }

 /**
  * Retrieves the correct ROLE type depending on the access level, where access level is an Integer.
  * Basically, this interprets the access value whether it's for a regular user or admin.
  *
  * @param access an integer value representing the access of the user
  * @return collection of granted authorities
  */
  public Collection<grantedauthority> getAuthorities(Integer access) {
   // Create a list of grants for this user
   List<grantedauthority> authList = new ArrayList<grantedauthority>(2);

   // All users are granted with ROLE_USER access
   // Therefore this user gets a ROLE_USER by default
   logger.debug("Grant ROLE_USER to this user");
   authList.add(new GrantedAuthorityImpl("ROLE_USER"));

   // Check if this user has admin access
   // We interpret Integer(1) as an admin user
   if ( access.compareTo(1) == 0) {
    // User has admin access
    logger.debug("Grant ROLE_ADMIN to this user");
    authList.add(new GrantedAuthorityImpl("ROLE_ADMIN"));
   }

   // Return list of granted authorities
   return authList;
   }
}
This custom service implements the
loadUserByUsername() method and provides a
getAuthorities() method for retrieving authorities.
The purpose of
loadUserByUsername() method is to return an instance of a fully populated Spring
User object. It's up to you how you retrieve the data. In this tutorial, we retrieve the user by searching a custom DAO.
The purpose of
getAuthorities() method is to translate our custom access level to a Spring Security
GrantedAuthority representation. Remember our custom database stores access levels as integers. Spring Security interprets authorities based on
GrantedAuthority() representations.
We just perform a simple if-else condition and return the corresponding authority:
Our custom database is accessible through a dummy DAO implementation:
UserDAO
package org.krams.tutorial.dao;

import java.util.ArrayList;
import java.util.List;

import org.apache.log4j.Logger;
import org.krams.tutorial.domain.DbUser;

/**
 * A custom DAO for accessing data from the database.
 *
 */
public class UserDAO {

 protected static Logger logger = Logger.getLogger("dao");

 /**
  * Simulates retrieval of data from a database.
  */
 public DbUser searchDatabase(String username) {
  // Retrieve all users from the database
  List users = internalDatabase();

  // Search user based on the parameters
  for(DbUser dbUser:users) {
   if ( dbUser.getUsername().equals(username)  == true ) {
    logger.debug("User found");
    // return matching user
    return dbUser;
   }
  }

  logger.error("User does not exist!");
  throw new RuntimeException("User does not exist!");
 }

 /**
  * Our fake database. Here we populate an ArrayList with a dummy list of users.
  */
 private List internalDatabase() {
  // Dummy database

  // Create a dummy array list
  List users = new ArrayList();
  DbUser user = null;

  // Create a new dummy user
  user = new DbUser();
  user.setUsername("john");
  // Actual password: admin
  user.setPassword("21232f297a57a5a743894a0e4a801fc3");
  // Admin user
  user.setAccess(1);

  // Add to array list
  users.add(user);

  // Create a new dummy user
  user = new DbUser();
  user.setUsername("jane");
  // Actual password: user
  user.setPassword("ee11cbb19052e40b07aac0ca060c23ee");
  // Regular user
  user.setAccess(2);

  // Add to array list
  users.add(user);

  return users;
 }

}
This dummy DAO doesn't really connect to a database. It just provides an in-memory list of users. If you just need to setup a simple in-memory user-service, please read my other tutorial
Spring Security 3 - MVC: Using a Simple User-Service Tutorial
Furthermore, we use a custom domain object
DbUser to represent the user's credentials derived from the database. If you look at the
CustomUserDetailsService again, we mapped DbUser to Spring's User object.
What's Spring User?
Models core user information retrieved by a UserDetailsService.
Implemented with value object semantics (immutable after construction, like a String). Developers may use this class directly, subclass it, or write their own UserDetails implementation from scratch.
Source: Spring Security 3 API for User
Here's DbUser:
DbUser
package org.krams.tutorial.domain;

/**
 * User domain
 */
public class DbUser {

 /**
  * The username
  */
 private String username;

 /**
  * The password as an MD5 value
  */
 private String password;

 /**
  * Access level of the user.
  * 1 = Admin user
  * 2 = Regular user
  */
 private Integer access;

 public String getUsername() {
  return username;
 }
 public void setUsername(String username) {
  this.username = username;
 }
 public String getPassword() {
  return password;
 }
 public void setPassword(String password) {
  this.password = password;
 }
 public Integer getAccess() {
  return access;
 }
 public void setAccess(Integer access) {
  this.access = access;
 }


}
To access the common page, enter the following URL:
http://localhost:8080/spring-security-integrationkrams/main/common
To access the admin page, enter the following URL:
http://localhost:8080/spring-security-integrationkrams/main/admin
To login, enter the following URL:
http://localhost:8080/spring-security-integrationkrams/auth/login
To logout, enter the following URL:
http://localhost:8080/spring-security-integrationkrams/auth/logout
If you like to disable Spring Security in this application, just remove the following configuration in the web.xml:
That's it. We got a working Spring MVC 3 application that's secured by Spring Security. We've also managed to authenticate our users using a custom data provider.
The best way to learn further is to try the actual application.
Download the project
You can access the project site at Google's Project Hosting at
http://code.google.com/p/spring3-security-mvc-integration-tutorial/
You can download the project as a Maven build. Look for the
spring-security-integration.zip in the Download sections.
You can run the project directly using an embedded server via Maven.
For Tomcat:
mvn tomcat:run
For Jetty:
mvn jetty:run
If you want to learn more about Spring MVC and Spring Security, feel free to read my other tutorials in the
Tutorials section.
References:
Spring Security 3.1.0.M2 API
Spring Security Reference Documentation
 Subscribe by reader
 Subscribe by email
Share
Subscribe by email
Share


