Monday, June 18, 2012

Email with Spring and SendGrid (Part 1)

Introduction

In this article we will study how to send email with Spring by integrating with SendGrid's email service. Instead of the usual SMTP, we will use HTTP to communicate with SendGrid.


Dependencies


Github

To access the source code, please visit the project's Github repository (click here)

Functional Specs

Let's define our application's requirements:
  • Create a simple form where users can compose and send emails
  • Emails do not need to be persisted in a database
  • Send email via HTTP instead of SMTP to avoid firewall issues

Here's our Use Case diagram:
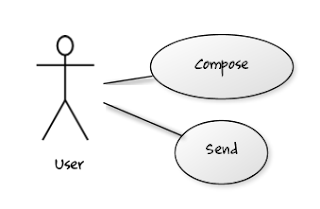

[User]-(Compose)
[User]-(Send)

In MVC terms, we decompose the application as follows:
  • Model: A simple Map object that conforms with SendGrid's message format
  • View: An HTML-based form where users can compose and send emails
  • Controller: Spring controller that receives the request. The controller delegates actual work to the service layer which eventually executes an HTTP call to send email to SendGrid.

What is SendGrid?

SendGrid's cloud-based email infrastructure relieves businesses of the cost and complexity of maintaining custom email systems. SendGrid provides reliable delivery, scalability and real-time analytics along with flexible API's that make custom integration a breeze.

Source: http://www.sendgrid.com

Why SendGrid?
  1. It's easy to integrate with.
  2. It has a free plan that allows 200 email messages per day.
  3. SendGrid has an HTTP API for sending emails which is very simple to use.

Screenshots

Let's preview how our application will look like after it has been completed. This is also a good way to clarify further our application's specs

This is the entry page where users can compose and send emails.

Compose Email Form

After clicking "Send", the email message is sent. An alert is shown to confirm the action.

Sent alert

When user clicks on "Reset", the contents of the fields are cleared. An alert is shown to confirm the action.

Fields cleared alert

Email Messages
This is the sample email received from Gmail. Notice Gmail is able to show that this email was sent via SendGrid.

Gmail email


email details

This is the sample email received from Yahoo.

Yahoo email

Next

In the next section, we will show how to sign-up with SendGrid's email service. This is required before we can start sending emails. Click here to proceed.
StumpleUpon DiggIt! Del.icio.us Blinklist Yahoo Furl Technorati Simpy Spurl Reddit Google I'm reading: Email with Spring and SendGrid (Part 1) ~ Twitter FaceBook

Subscribe by reader Subscribe by email Share

Email with Spring and SendGrid (Part 2)

Review

In the previous section, we have laid down the functional specs of the application . In this section, we will demonstrate how to sign-up with SendGrid's email service. This is required so that we can integrate with their service.

Disclaimer

SendGrid manually approves each account. It takes almost a day before they can approve your account. If it takes longer, I suggest sending an email to their tech support.


1. Go to SendGrid's page at http://www.sendgrid.com


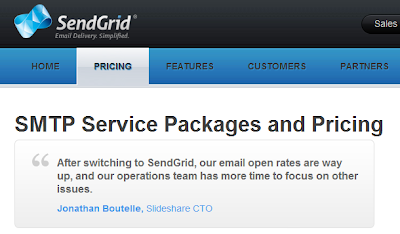
2. Click on "Pricing" and scroll-down.


3. At the bottom portion of the page, there's a link to the "Free Plan". Click it.


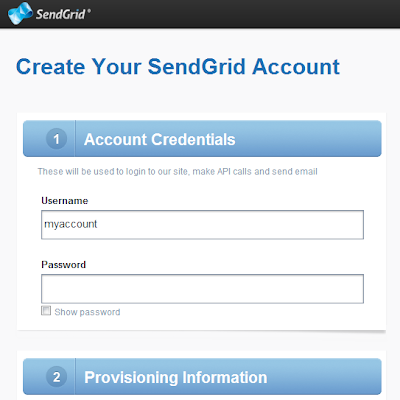
4. The account creation page is displayed. Fill-in the details. Then submit your application. Remember your username and password here. These will be your API username and key.


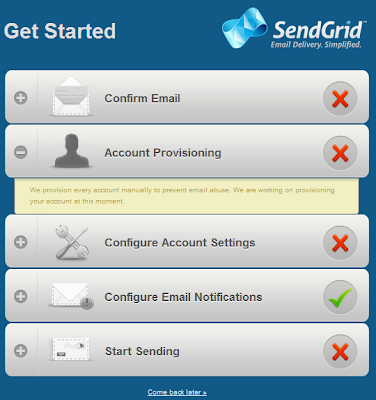
5. You will be redirected to the "Get Started" page. Complete all the required actions. Notice your account is on provision. It might take a day for it to be approved.


Account Completion
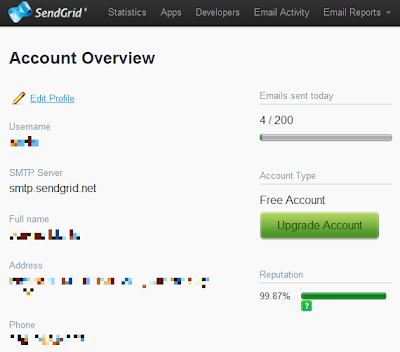
Once your account has been provisioned, visit your SendGrid account page


SendGrid API

SendGrid offers numerous APIs to allow developers to fully integrate with their service. They have the following APIs:
  • Customer Subuser API
  • Event API
  • Parse API
  • Web API
  • SMTP API
  • Reseller API
  • Newsletter API

We will focus on the Mail module, which is under the Web API. Please see http://docs.sendgrid.com/documentation/api/web-api/mail/#send for the complete documentation.

To test the Mail module, you can either use your browser or CURL (if you're familiar with it).

Browser-based test:
https://sendgrid.com/api/mail.send.xml?api_user=youremail@domain.com&api_key=secureSecret&to=destination@example.com&toname=Destination&subject=Example%20Subject&text=testingtextbody&from=info@domain.com

CURL-based test:
curl -d 'to=destination@example.com&toname=Destination&subject=Example Subject&text=testingtextbody&from=info@domain.com&api_user=sendgridUsername&api_key=sendgridPassword' https://sendgrid.com/api/mail.send.json

But how do we use the Web API via Java and Spring? We will discuss that on the next section. But to satisfy your inquisitive minds, here's a preview:


Next

In the next section, we will start writing the Java classes and discuss the SendGrid API. Click here to proceed.
StumpleUpon DiggIt! Del.icio.us Blinklist Yahoo Furl Technorati Simpy Spurl Reddit Google I'm reading: Email with Spring and SendGrid (Part 2) ~ Twitter FaceBook

Subscribe by reader Subscribe by email Share

Email with Spring and SendGrid (Part 3)

Review

In the previous section, we have learned how to sign-up with SendGrid's free plan. In this section, we will start writing the Java classes and discuss the project's structure.


Project Structure

Our application is a Maven project which means our project follows the Maven structure.

Here's a preview of our project's structure:


Domain Layer

The domain layer contains a Message class that represents an email message.


Controller Layer

The controller layer contains a simple controller that serves a form for composing and sending emails. It also contains a send method that accepts a Message object. The controller delegates the sending part to an email service.


Service Layer

The service layer contains the email service. We have a simple interface EmailService for sending messages.


The actual implementation SendGridEmailService relies on RestTemplate to send the email message via HTTP as a POST method.


Utility Layer

This layer contains helper classes and interfaces. Here we've extracted the required SendGrid parameters for sending emails via HTTP. Please refer to Part 2 of this guide if you need to review the SendGrid Web API.


View Layer

The view layer contains a simple html form for composing and sending email messages. One important section here that needs to be discussed is the usage of the postJSON plugin.

jQuery plugin

postJSON is a jQuery plugin that allows sending of JSON objects via POST. This plugin is based a plugin I found at the jQuery plugin repository. Unfortunately, the location doesn't seem to exist anymore. Also, I've made some modifications with the plugin (see the comments).


Next

We've completed writing our Java classes. In the next section, we will start writing the configuration files. Click here to proceed.

StumpleUpon DiggIt! Del.icio.us Blinklist Yahoo Furl Technorati Simpy Spurl Reddit Google I'm reading: Email with Spring and SendGrid (Part 3) ~ Twitter FaceBook

Subscribe by reader Subscribe by email Share

Email with Spring and SendGrid (Part 4)

Review

In the previous section, we have implemented the Java classes. In this section, we will start writing the configuration files to complete our Spring application.


Configuration

To complete our application, here are the important configuration files that needs to be declared:
  • spring.properties
  • applicationContext.xml
  • spring-servlet.xml
  • web.xml

The spring.properties file contains the SendGrid user and key values to access the Web API. This is equivalent to your SendGrid's username and password.


applicationContext.xml


spring-servlet.xml


web.xml


Next

In the next section, we will build and run the application using Maven, and show how to import the project in Eclipse. Click here to proceed.
StumpleUpon DiggIt! Del.icio.us Blinklist Yahoo Furl Technorati Simpy Spurl Reddit Google I'm reading: Email with Spring and SendGrid (Part 4) ~ Twitter FaceBook

Subscribe by reader Subscribe by email Share

Email with Spring and SendGrid (Part 5)

Review

We have just completed our application! In the previous sections, we have discussed the functional specs, created the Java classes, declared the configuration files, and wrote the HTML files. In this section, we will build and run the application using Maven, and show how to import the project in Eclipse.


Running the Application

Access the source code

To download the source code, please visit the project's Github repository (click here)

Building with Maven

  1. Ensure Maven is installed
  2. Open a command window (Windows) or a terminal (Linux/Mac)
  3. Run the following command:
    mvn tomcat:run
  4. You should see the following output:
    [INFO] Scanning for projects...
    [INFO] Searching repository for plugin with prefix: 'tomcat'.
    [INFO] artifact org.codehaus.mojo:tomcat-maven-plugin: checking for updates from central
    [INFO] artifact org.codehaus.mojo:tomcat-maven-plugin: checking for updates from snapshots
    [INFO] ------------------------------------------
    [INFO] Building spring-sendgrid-tutorial Maven Webapp
    [INFO]    task-segment: [tomcat:run]
    [INFO] ------------------------------------------
    [INFO] Preparing tomcat:run
    [INFO] [apt:process {execution: default}]
    [INFO] [resources:resources {execution: default-resources}]
    [INFO] [tomcat:run {execution: default-cli}]
    [INFO] Running war on http://localhost:8080/spring-sendgrid-tutorial
    Jun 18, 2012 10:27:47 PM org.apache.catalina.startup.Embedded start
    INFO: Starting tomcat server
    Jun 18, 2012 10:27:47 PM org.apache.catalina.core.StandardEngine start
    INFO: Starting Servlet Engine: Apache Tomcat/6.0.29
    Jun 18, 2012 10:27:48 PM org.apache.catalina.core.ApplicationContext log
    INFO: Initializing Spring root WebApplicationContext
    Jun 18, 2012 10:27:49 PM org.apache.coyote.http11.Http11Protocol init
    INFO: Initializing Coyote HTTP/1.1 on http-8080
    Jun 18, 2012 10:27:49 PM org.apache.coyote.http11.Http11Protocol start
    INFO: Starting Coyote HTTP/1.1 on http-8080
    
  5. Note: If the project will not build due to missing repositories, please enable the repositories section in the pom.xml!

Access the Entry page

  1. Follow the steps with Building with Maven
  2. Open a browser
  3. Enter the following URL (8080 is the default port for Tomcat):
    http://localhost:8080/spring-sendgrid-tutorial/email

Send an email

  1. Compose and email
  2. Send it. You should see within the logs an output similar to the following:
    [DEBUG] [tomcat-http--23 04:25:03] (TraceInterceptor.java:writeToLog:21) Entering EmailController.send(org.krams.domain.Message@486d1d)
    [DEBUG] [tomcat-http--23 04:25:03] (TraceInterceptor.java:writeToLog:21) Entering SendGridEmailService.send(org.krams.domain.Message@486d1d)
    [DEBUG] [tomcat-http--23 04:25:04] (TraceInterceptor.java:writeToLog:21) Leaving SendGridEmailService.send(): StatusResponse [success=true, message=Message sent, ]
    [DEBUG] [tomcat-http--23 04:25:04] (TraceInterceptor.java:writeToLog:21) Leaving EmailController.send(): StatusResponse [success=true, message=Message sent, ]
    

Import the project in Eclipse

  1. Ensure Maven is installed
  2. Open a command window (Windows) or a terminal (Linux/Mac)
  3. Run the following command:
    mvn eclipse:eclipse -Dwtpversion=2.0
  4. You should see the following output:
    [INFO] Scanning for projects...
    [INFO] Searching repository for plugin with prefix: 'eclipse'.
    [INFO] org.apache.maven.plugins: checking for updates from central
    [INFO] org.apache.maven.plugins: checking for updates from snapshots
    [INFO] org.codehaus.mojo: checking for updates from central
    [INFO] org.codehaus.mojo: checking for updates from snapshots
    [INFO] artifact org.apache.maven.plugins:maven-eclipse-plugin: checking for updates from central
    [INFO] artifact org.apache.maven.plugins:maven-eclipse-plugin: checking for updates from snapshots
    [INFO] -----------------------------------------
    [INFO] Building spring-sendgrid-tutorial Maven Webapp
    [INFO]    task-segment: [eclipse:eclipse]
    [INFO] -----------------------------------------
    [INFO] Preparing eclipse:eclipse
    [INFO] No goals needed for project - skipping
    [INFO] [eclipse:eclipse {execution: default-cli}]
    [INFO] Adding support for WTP version 2.0.
    [INFO] -----------------------------------------
    [INFO] BUILD SUCCESSFUL
    [INFO] -----------------------------------------
    
    This command will add the following files to your project:
    .classpath
    .project
    .settings
    target
    You may have to enable "show hidden files" in your file explorer to view them
  5. Open Eclipse and import the project

Conclusion

That's it! We've have successfully completed our email application with Spring and SendGrid integration. We've learned how to setup a SendGrid account and how to utilize its Web API via Spring's RestTemplate.

I hope you've enjoyed this tutorial. Don't forget to check my other tutorials at the Tutorials section.

Revision History


Revision Date Description
1 June 18 2012 Uploaded tutorial


StumpleUpon DiggIt! Del.icio.us Blinklist Yahoo Furl Technorati Simpy Spurl Reddit Google I'm reading: Email with Spring and SendGrid (Part 5) ~ Twitter FaceBook

Subscribe by reader Subscribe by email Share