Showing posts with label MVC. Show all posts

Thursday, March 8, 2012

Spring MVC 3.1 - Implement CRUD with Spring Data Neo4j (Part 1)

Introduction

In this tutorial, we will create a simple CRUD application using Spring 3.1 and Neo4j. We will based this tutorial on a previous guide for MongoDB. This means we will re-use our existing design and implement only the data layer to use Neo4j as our data store.


Dependencies

  • Spring core 3.1.0.RELEASE
  • Spring Data Neo4j 2.1.0.M1
  • Neo4j Kernel 1.6
  • Neo4j Cypher 1.6
  • Neo4j Cypher DSL 1.6
  • See pom.xml for details

Github

To access the source code, please visit the project's Github repository (click here)

Functional Specs

Before we start, let's define our application's specification as follows:
  • A CRUD page for managing users
  • Use AJAX to avoid page refresh
  • Users have roles: either admin or regular (default)
  • Everyone can create new users and edit existing ones
  • When editing, users can only edit first name, last name, and role fields
  • A username is assumed to be unique

Here's our Use Case diagram:
[User]-(View)
[User]-(Add) 
[User]-(Edit) 
[User]-(Delete) 

Database

If you're new to Neo4j and Spring Data Neo4j and coming from a SQL-background, please take some time to read the following references:

In its simplest form, Neo4j is a NoSQL graph database containing nodes and relationships.

What is Neo4j?

The Neo4j data model consists of nodes and relationships, both of which can have key/value-style properties. What does that mean, exactly? Nodes are the graph database name for records, with property keys instead of column names. That's normal enough. Relationships are the special part. In Neo4j, relationships are first-class citizens, meaning they are more than a simple foreign-key reference to another record, relationships carry information.

Source: Spring Data Neo4j - Chapter 4. Learning Neo4j

What is a Graph database?

A graph database stores data in a graph, the most generic of data structures, capable of elegantly representing any kind of data in a highly accessible way.

“A Graph —records data in→ Nodes —which have→ Properties”

“Nodes —are organized by→ Relationships —which also have→ Properties”

“A Traversal —navigates→ a Graph; it —identifies→ Paths —which order→ Nodes”

“An Index —maps from→ Properties —to either→ Nodes or Relationships”

“A Graph Database —manages a→ Graph and —also manages related→ Indexes”


Source: What is a Graph Database?

From Java to Neo4j

We have two Java classes representing our domain: User and Role. Here is the Class diagram:

# Cool UML Diagram
[User|id;firstName;lastName;username;password;role{bg:orange}]1--1> [Role|id;role{bg:green}]

In Neo4j, User and Role are nodes, and the link between the two is a relationship. In Part 2 we will demonstrate how to declare them as nodes and how to create the relationship.

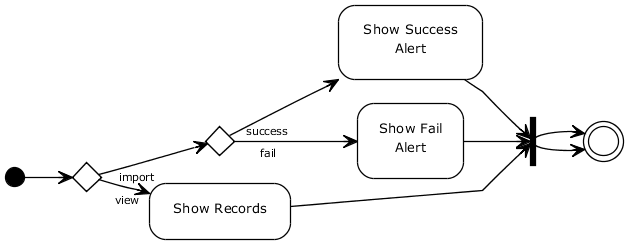
Here's the Activity diagram:

http://yuml.me/diagram/activity/(start)-%3E%3Cd1%3Eview-%3E(Show%20Records)-%3E%7Ca%7C-%3E(end),%20%3Cd1%3Eadd-%3E(Show%20Form)-%3E%7Ca%7C,%20%3Cd1%3Eedit-%3E%3Cd2%3Ehas%20selected-%3E(Show%20Form)-%3E%7Ca%7C,%20%3Cd2%3Eno%20record%20selected-%3E(Popup%20Alert)-%3E%7Ca%7C,%20%3Cd1%3Edelete-%3E%3Cd3%3Ehas%20selected-%3E(Delete%20Record)-%3E%7Ca%7C,%20%3Cd3%3Eno%20record%20selected-%3E(Popup%20Alert)-%3E%7Ca%7C.

Screenshots

Let's preview how the application will look like after it's finished. This is also a good way to clarify further our application's specs. Note: These are the same screenshots you will see from the Spring MVC 3.1 - Implement CRUD with Spring Data MongoDB guide (We're reusing the exact presentation layer).

Entry page
The entry page is the primary page that users will see. It contains a table showing user records and four buttons for adding, editing, deleting, and reloading data. All interactions will happen in this page.

Entry page

Edit existing record
When user clicks the Edit button, an Edit Record form shall appear after the table.

Edit record form

When a user submits the form, a success or failure alert should appear.

Success alert

When the operation is successful, the update record should reflect on the table.

Edited record appears on the table

Create new record
When a user clicks the New button, a Create New Record form shall appear after the table.

Create new record form

When a user submits the form, a success or failure alert should appear.

Success alert

When the operation is successful, the new record should appear on the table.

New record shows on the form

Delete record
When user clicks the Delete button, a success or failure alert should appear.

Success alert

Reload record
When user clicks the Reload button, the data on the table should be reloaded.

Errors
When user clicks the Edit or Delete button without selecting a record first, a "Select a record first!" alert should appear.

Error alert

Next

In the next section, we will write the Java classes and discuss the application's layers. Click here to proceed.
StumpleUpon DiggIt! Del.icio.us Blinklist Yahoo Furl Technorati Simpy Spurl Reddit Google I'm reading: Spring MVC 3.1 - Implement CRUD with Spring Data Neo4j (Part 1) ~ Twitter FaceBook

Subscribe by reader Subscribe by email Share

Spring MVC 3.1 - Implement CRUD with Spring Data Neo4j (Part 2)

Review

In the previous section, we have laid down the functional specs of the application and discussed the Neo4j data model. In this section, we will discuss the project's structure, write the Java classes, and map our domain classes to the Neo4j data model.


Project Structure

Our application is a Maven project and therefore follows Maven structure. As we create the classes, we've organized them in logical layers: domain, repository, service, and controller.

Here's a preview of our project's structure:


The Layers

Domain Layer

This layer contains the following POJOs:
  • User - represents our user
  • Role - represents the role of the user
  • UserRoleRelationship - represents the relationship of a user to its role
  • .


Notice we've annotated our domain classes with Spring Data Neo4j annotations. Here are the explanations:

@NodeEntity

The @NodeEntity annotation is used to turn a POJO class into an entity backed by a node in the graph database. Fields on the entity are by default mapped to properties of the node. Fields referencing other node entities (or collections thereof) are linked with relationships.

Source: Spring Data Neo4j Reference

@GraphId

For the simple mapping this is a required field which must be of type Long. It is used by Spring Data Neo4j to store the node or relationship-id to re-connect the entity to the graph.

For the advanced mapping such a field is optional. Only if the underlying id has to be accessed, it is needed.

Source: Spring Data Neo4j Reference

@Indexed

@Indexed: Making entities searchable by field value

The @Indexed annotation can be declared on fields that are intended to be indexed by the Neo4j indexing facilities. The resulting index can be used to later retrieve nodes or relationships that contain a certain property value, e.g. a name. Often an index is used to establish the start node for a traversal.

Source: Spring Data Neo4j Reference

@Fetch

To have the collections of relationships being read eagerly ... we have to annotate it with the @Fetch annotation. Otherwise Spring Data Neo4j refrains from following relationships automatically.

Source: Spring Data Neo4j Reference

@RelatedTo

@RelatedTo: Connecting node entities

Every field of a node entity that references one or more other node entities is backed by relationships in the graph. These relationships are managed by Spring Data Neo4j automatically.

The simplest kind of relationship is a single field pointing to another node entity (1:1). In this case, the field does not have to be annotated at all, although the annotation may be used to control the direction and type of the relationship. When setting the field, a relationship is created when the entity is persisted. If the field is set to null, the relationship is removed.

Source: Spring Data Neo4j Reference

@RelationshipEntity

To access the full data model of graph relationships, POJOs can also be annotated with @RelationshipEntity, making them relationship entities. Just as node entities represent nodes in the graph, relationship entities represent relationships. As described above, fields annotated with @RelatedTo provide a way to link node entities together via relationships, but it provides no way of accessing the relationships themselves.

Relationship entities can be accessed via by @RelatedToVia-annotated

Fields in relationship entities are, similarly to node entities, persisted as properties on the relationship. For accessing the two endpoints of the relationship, two special annotations are available: @StartNode and @EndNode. A field annotated with one of these annotations will provide read-only access to the corresponding endpoint, depending on the chosen annotation.

Source: Spring Data Neo4j Reference

Controller Layer

This layer contains two controllers, MediatorController and UserController
  • MediatorController is responsible for redirecting requests to appropriate pages. This isn't really required but it's here for organizational purposes.
  • UserController is responsible for handling user-related requests such as adding and deleting of records


Service Layer

This layer contains a single service, UserService for managing users.


What is Spring Data Neo4j?

Spring Data Neo4j enables POJO based development for the Graph Database Neo4j. It maps annotated entity classes to the Neo4j Graph Database with advanced mapping functionality. The template programming model is equivalent to well known Spring templates and builds the basis for interaction with the graph and is also used for the advanced repository support.
Spring Data Neo4j is part of the Spring Data project which aims to provide convenient support for NoSQL databases.

Source: http://www.springsource.org/spring-data/neo4j

Utility classes

TraceInterceptor class is an AOP-based utility class to help us debug our application. This is a subclass of CustomizableTraceInterceptor (see Spring Data JPA FAQ)


Next

In the next section, we will focus on the configuration files for enabling Spring MVC. Click here to proceed.
StumpleUpon DiggIt! Del.icio.us Blinklist Yahoo Furl Technorati Simpy Spurl Reddit Google I'm reading: Spring MVC 3.1 - Implement CRUD with Spring Data Neo4j (Part 2) ~ Twitter FaceBook

Subscribe by reader Subscribe by email Share

Spring MVC 3.1 - Implement CRUD with Spring Data Neo4j (Part 3)

Review

In the previous section, we have implemented the Java classes and discussed the Neo4j service. In this section, we will write the configuration files for enabling Spring MVC and Neo4j support.


Configuration

To enable Neo4j support, we need to declare the following beans
  • a Spring Data Neo4j repository
  • a Neo4j store directory
  • Optionally, we declared an InitNeo4jService to automatically populate our database with sample data (currently disabled)


Finally, here's our applicationContext.xml file

Next

In the next section, we will create the HTML and JavaScript files. Click here to proceed.
StumpleUpon DiggIt! Del.icio.us Blinklist Yahoo Furl Technorati Simpy Spurl Reddit Google I'm reading: Spring MVC 3.1 - Implement CRUD with Spring Data Neo4j (Part 3) ~ Twitter FaceBook

Subscribe by reader Subscribe by email Share

Spring MVC 3.1 - Implement CRUD with Spring Data Neo4j (Part 4)

Review

In the previous section, we have created the configuration files and discussed them accordingly. In this section, we will focus on the view layer, in particular the HTML files and JavaScript codes.


HTML Files (with AJAX)

To improve the user experience, we will use AJAX to make the application responsive. All actions will be performed on the same page (no page refresh). Consequently, we only have one HTML page for the entire application. The rest are JavaScript files.

Notice how we've structured the HTML page. Basically, we followed the concept of separation of concerns by separating markup tags, CSS, and JavaScript code. We tried as much as possible to make the JavaScript code and CSS styles unobtrusive.


A Closer Look

At first glance, this JSP file seems complex. On the contrary, it's quite simple. Let's break it into smaller pieces for clarity:

URLs
The following declares our URLs as mapped to our UserController. We're using the url taglib to make the URL portable.


Imports
Here we're importing custom CSS and JavaScript files, along with jQuery.


What is jQuery?
jQuery is a fast and concise JavaScript Library that simplifies HTML document traversing, event handling, animating, and Ajax interactions for rapid web development. jQuery is designed to change the way that you write JavaScript.

Source: http://jquery.com/

JavaScript initialization
Here we're preparing the URLs, attaching functions to our buttons, and initially loading the table. The main chunk of the JavaScript code is referenced from an external JavaScript file custom.js
  • loadTable(): Performs an AJAX request and populates our table with records
  • toggleForms(): Hides and shows specific forms based on the passed argument
  • toggleCrudButtons(): Hides and shows buttons
  • hasSelected(): Checks whether a record has been selected
  • fillEditForm(): Fills the Edit form with details based on the selected record
  • submitDeleteRecord(): Submits a delete request via AJAX
  • submitNewRecord(): Submits a create new record request via AJAX
  • submitUpdateRecord(): Submits an update record request via AJAX


Table and buttons
This is a simple table for displaying records. The buttons are for interacting with the data.


Forms
These are forms used when adding and editing records.


Preview

If we run our application, this is what we shall see:

Entry page

For more screenshots, please visit Part 1 of this tutorial and check the Screenshots section.

Next

In the next section, we will build and run the application using Maven, and show how to import the project in Eclipse. Click here to proceed.
StumpleUpon DiggIt! Del.icio.us Blinklist Yahoo Furl Technorati Simpy Spurl Reddit Google I'm reading: Spring MVC 3.1 - Implement CRUD with Spring Data Neo4j (Part 4) ~ Twitter FaceBook

Subscribe by reader Subscribe by email Share

Spring MVC 3.1 - Implement CRUD with Spring Data Neo4j (Part 5)

Review

We have just completed our application! In the previous sections, we have discussed the functional specs, created the Java classes, declared the configuration files, and wrote the HTML files. In this section, we will build and run the application using Maven, and show how to import the project in Eclipse.


Running the Application

Access the source code

To download the source code, please visit the project's Github repository (click here)

Preparing the data source

  • You don't need to run a separate Neo4j server because it will start simultaneously with the application.
  • There's no need to populate the database.
  • Due to some issues with the initialization service, I have decided to deactivate the service (though it's included in the source code for reference).

Building with Maven

  1. Ensure Maven is installed
  2. Open a command window (Windows) or a terminal (Linux/Mac)
  3. Run the following command:
    mvn tomcat:run
  4. You should see the following output:
    [INFO] Scanning for projects...
    [INFO] Searching repository for plugin with prefix: 'tomcat'.
    [INFO] artifact org.codehaus.mojo:tomcat-maven-plugin: checking for updates from central
    [INFO] artifact org.codehaus.mojo:tomcat-maven-plugin: checking for updates from snapshots
    [INFO] ------------------------------------------
    [INFO] Building spring-neo4j-tutorial Maven Webapp
    [INFO]    task-segment: [tomcat:run]
    [INFO] ------------------------------------------
    [INFO] Preparing tomcat:run
    [INFO] [apt:process {execution: default}]
    [INFO] [resources:resources {execution: default-resources}]
    [INFO] [tomcat:run {execution: default-cli}]
    [INFO] Running war on http://localhost:8080/spring-neo4j-tutorial
    Mar 9, 2012 7:19:07 AM org.apache.catalina.startup.Embedded start
    INFO: Starting tomcat server
    Mar 9, 2012 7:19:07 AM org.apache.catalina.core.StandardEngine start
    INFO: Starting Servlet Engine: Apache Tomcat/6.0.29
    Mar 9, 2012 7:19:07 AM org.apache.catalina.core.ApplicationContext log
    INFO: Initializing Spring root WebApplicationContext
    Mar 9, 2012 7:19:11 AM org.apache.coyote.http11.Http11Protocol init
    INFO: Initializing Coyote HTTP/1.1 on http-8080
    Mar 9, 2012 7:19:11 AM org.apache.coyote.http11.Http11Protocol start
    INFO: Starting Coyote HTTP/1.1 on http-8080
    
  5. Note: If the project will not build due to missing repositories, please enable the repositories section in the pom.xml!

Access the Entry page

  1. Follow the steps with Building with Maven
  2. Open a browser
  3. Enter the following URL (8080 is the default port for Tomcat):
    http://localhost:8080/spring-neo4j-tutorial/

Import the project in Eclipse

  1. Ensure Maven is installed
  2. Open a command window (Windows) or a terminal (Linux/Mac)
  3. Run the following command:
    mvn eclipse:eclipse -Dwtpversion=2.0
  4. You should see the following output:
    [INFO] Scanning for projects...
    [INFO] Searching repository for plugin with prefix: 'eclipse'.
    [INFO] org.apache.maven.plugins: checking for updates from central
    [INFO] org.apache.maven.plugins: checking for updates from snapshots
    [INFO] org.codehaus.mojo: checking for updates from central
    [INFO] org.codehaus.mojo: checking for updates from snapshots
    [INFO] artifact org.apache.maven.plugins:maven-eclipse-plugin: checking for updates from central
    [INFO] artifact org.apache.maven.plugins:maven-eclipse-plugin: checking for updates from snapshots
    [INFO] -----------------------------------------
    [INFO] Building spring-neo4j-tutorial Maven Webapp
    [INFO]    task-segment: [eclipse:eclipse]
    [INFO] -----------------------------------------
    [INFO] Preparing eclipse:eclipse
    [INFO] No goals needed for project - skipping
    [INFO] [eclipse:eclipse {execution: default-cli}]
    [INFO] Adding support for WTP version 2.0.
    [INFO] -----------------------------------------
    [INFO] BUILD SUCCESSFUL
    [INFO] -----------------------------------------
    
    This command will add the following files to your project:
    .classpath
    .project
    .settings
    target
    You may have to enable "show hidden files" in your file explorer to view them
  5. Open Eclipse and import the project

Conclusion

That's it! We've have successfully completed our Spring MVC 3.1 web application. We've learned how to integrate Neo4j using the Spring Data Neo4j framework, and studied how to map our domain objects to the Neo4j graph. We've only explored the basics of Neo4j, but I hope that this simple tutorial will provide a good start.

I hope you've enjoyed this tutorial. Don't forget to check my other tutorials at the Tutorials section.

Revision History


Revision Date Description
1 March 8 2012 Uploaded tutorial
2 March 9 2012 Uploaded source code to Github

StumpleUpon DiggIt! Del.icio.us Blinklist Yahoo Furl Technorati Simpy Spurl Reddit Google I'm reading: Spring MVC 3.1 - Implement CRUD with Spring Data Neo4j (Part 5) ~ Twitter FaceBook

Subscribe by reader Subscribe by email Share

Thursday, February 16, 2012

Spring Batch Tutorial (Part 1)

In this tutorial, we will create a simple Spring Batch application to demonstrate how to process a series of jobs where the primary purpose is to import a lists of comma-delimited and fixed-length records. In addition, we will add a web interface using Spring MVC to teach how to trigger jobs manually, and so that we can visually inspect the imported records. In the data layer, we will use JPA, Hibernate, and MySQL.


Dependencies

  • Spring core 3.1.0.RELEASE
  • Spring Batch 2.1.8.RELEASE
  • See pom.xml for details

Github

To access the source code, please visit the project's Github repository (click here)

Functional Specs

Before we start, let's define the application's specs as follows:
  • Import a list of comma-delimited records
  • Import a list of fixed-length records
  • Import a list of mixed-type records
  • Jobs must be triggered using a web interface
  • Display the imported records in a web interface
  • Each record represents a user and its associated access levels

Here's our Use Case diagram:
[User]-(Import job1)
[User]-(Import job2) 
[User]-(Import job3) 
[User]-(View records)

The CSV Files

To visualize what we want to do, let's examine first the files that we plan to import:

User Files

user1.csv
This file contains comma-separated value (CSV) records representing User records. Each line has the following tokens: username, first name, last name, password.

user2.csv
This file contains fixed-length records representing User records. Each line has the following tokens: username(positions 1-5), first name(6-9), last name(10-16), password(17-25).

user2.csv
This file contains comma-separated value and fixed-length records representing User records. Each line has the following tokens: username, first name, last name, password.

This file contains two types of CSV-records:
  • DELIMITED-RECORD-A: uses the standard comma delimiter
  • DELIMITED-RECORD-B: uses | delimiter

It also contains two types of fixed-length records:
  • FIXED-RECORD-A: username(16-20), first name(21-25), last name(26-31), password(32-40)
  • FIXED-RECORD-B: username(16-21), first name(22-27), last name(28-33), password(35-42)

Role Files

role1.csv
This file contains comma-separated value (CSV) records representing Role records. Each line has the following tokens: username and access level.

role2.csv
This file contains fixed-length records representing Role records. Each line has the following tokens: username and access level.

role3.csv
This file contains comma-separated value (CSV) records representing Role records. Each line has the following tokens: username and access level.

By now you should have a basic idea of the file formats that we will be importing. You must realize that all we want to do is import these files and display them on a web interface.

Diagrams

Here's the Class diagram:
# Cool UML Diagram
[User|id;firstName;lastName;username;password;role{bg:orange}]1--1> [Role|id;role{bg:green}]

Here's the Activity Diagram:

(start)->import->success->(Show Success Alert)->|a|->(end),
fail->(Show Fail Alert)->|a|,
view->(Show Records)->|a|->(end)

Screenshots

Let's preview how the application will look like after it's finished. This is also a good way to clarify further the application's specs.

Entry page
The entry page is the primary page that users will see. It contains a table showing user records and four buttons for adding, editing, deleting, and reloading data. All interactions will happen in this page.

Entry page


Next

In the next section, we will write the Java classes. Click here to proceed.
StumpleUpon DiggIt! Del.icio.us Blinklist Yahoo Furl Technorati Simpy Spurl Reddit Google I'm reading: Spring Batch Tutorial (Part 1) ~ Twitter FaceBook

Subscribe by reader Subscribe by email Share

Spring Batch Tutorial (Part 4)

Review

We have just completed our application! In the previous sections, we have discussed how to perform batch processing with Spring Batch. We have also created a Spring MVC application to act as a web interface. In this section, we will build and run the application using Maven, and demonstrate how to import the project in Eclipse.


Running the Application

Access the source code

To download the source code, please visit the project's Github repository (click here)

Preparing the data source

  1. Run MySQL (install one if you don't have one yet)
  2. Create a new database:
    spring_batch_tutorial
  3. Import the following file which is included in the source code under the src/main/resources folder:
    schema-mysql.sql
    This script contains Spring Batch infrastructure tables which can be found in the Spring Batch core library. I have copied it here separately for easy access.

Building with Maven

  1. Ensure Maven is installed
  2. Open a command window (Windows) or a terminal (Linux/Mac)
  3. Run the following command:
    mvn tomcat:run
  4. You should see the following output:
    [INFO] Scanning for projects...
    [INFO] Searching repository for plugin with prefix: 'tomcat'.
    [INFO] artifact org.codehaus.mojo:tomcat-maven-plugin: checking for updates from central
    [INFO] artifact org.codehaus.mojo:tomcat-maven-plugin: checking for updates from snapshots
    [INFO] ------------------------------------------
    [INFO] Building spring-batch-tutorial Maven Webapp
    [INFO]    task-segment: [tomcat:run]
    [INFO] ------------------------------------------
    [INFO] Preparing tomcat:run
    [INFO] [apt:process {execution: default}]
    [INFO] [resources:resources {execution: default-resources}]
    [INFO] [tomcat:run {execution: default-cli}]
    [INFO] Running war on http://localhost:8080/spring-batch-tutorial
    Feb 13, 2012 9:36:54 PM org.apache.catalina.startup.Embedded start
    INFO: Starting tomcat server
    Feb 13, 2012 9:36:55 PM org.apache.catalina.core.StandardEngine start
    INFO: Starting Servlet Engine: Apache Tomcat/6.0.29
    Feb 13, 2012 9:36:55 PM org.apache.catalina.core.ApplicationContext log
    INFO: Initializing Spring root WebApplicationContext
    Feb 13, 2012 9:37:01 PM org.apache.coyote.http11.Http11Protocol init
    INFO: Initializing Coyote HTTP/1.1 on http-8080
    Feb 13, 2012 9:37:01 PM org.apache.coyote.http11.Http11Protocol start
    INFO: Starting Coyote HTTP/1.1 on http-8080
    
  5. Note: If the project will not build due to missing repositories, please enable the repositories section in the pom.xml!

Access the Entry page

  1. Follow the steps with Building with Maven
  2. Open a browser
  3. Enter the following URL (8080 is the default port for Tomcat):
    http://localhost:8080/spring-batch-tutorial/

Import the project in Eclipse

  1. Ensure Maven is installed
  2. Open a command window (Windows) or a terminal (Linux/Mac)
  3. Run the following command:
    mvn eclipse:eclipse -Dwtpversion=2.0
  4. You should see the following output:
    [INFO] Scanning for projects...
    [INFO] Searching repository for plugin with prefix: 'eclipse'.
    [INFO] org.apache.maven.plugins: checking for updates from central
    [INFO] org.apache.maven.plugins: checking for updates from snapshots
    [INFO] org.codehaus.mojo: checking for updates from central
    [INFO] org.codehaus.mojo: checking for updates from snapshots
    [INFO] artifact org.apache.maven.plugins:maven-eclipse-plugin: checking for updates from central
    [INFO] artifact org.apache.maven.plugins:maven-eclipse-plugin: checking for updates from snapshots
    [INFO] -----------------------------------------
    [INFO] Building spring-batch-tutorial Maven Webapp
    [INFO]    task-segment: [eclipse:eclipse]
    [INFO] -----------------------------------------
    [INFO] Preparing eclipse:eclipse
    [INFO] No goals needed for project - skipping
    [INFO] [eclipse:eclipse {execution: default-cli}]
    [INFO] Adding support for WTP version 2.0.
    [INFO] -----------------------------------------
    [INFO] BUILD SUCCESSFUL
    [INFO] -----------------------------------------
    
    This command will add the following files to your project:
    .classpath
    .project
    .settings
    target
    You may have to enable "show hidden files" in your file explorer to view them
  5. Open Eclipse and import the project

Conclusion

That's it! We've have successfully completed our Spring Batch application and learned how to process of jobs in batches. We've also added Spring MVC support to allow jobs to be controlled online.

I hope you've enjoyed this tutorial. Don't forget to check my other tutorials at the Tutorials section.

Revision History


Revision Date Description
1 Feb 16 2012 Uploaded tutorial and Github repository

StumpleUpon DiggIt! Del.icio.us Blinklist Yahoo Furl Technorati Simpy Spurl Reddit Google I'm reading: Spring Batch Tutorial (Part 4) ~ Twitter FaceBook

Subscribe by reader Subscribe by email Share

Spring Batch Tutorial (Part 2)

Review

In the previous section, we have laid down the functional specs of the application and examined the raw files that are to be imported. In this section, we will discuss the project's structure and write the Java classes.


Project Structure

Our application is a Maven project and therefore follows Maven structure. As we create the classes, we've organized them in logical layers: domain, repository, service, and controller.

Here's a preview of our project's structure:

The Layers

Disclaimer

I will only discuss the Spring Batch-related classes here. And I've purposely left out the unrelated classes because I have described them in detail already from my previous tutorials. See the following guides:

Controller Layer

The BatchJobController handles batch requests. There are three job mappings:
  • /job1
  • /job2
  • /job3
Everytime a job is run, a new JobParameter is initialized as the job's parameter. We use the current date to be the distinguishing parameter. This means every job trigger is considered a new job.

What is a JobParameter?

"how is one JobInstance distinguished from another?" The answer is: JobParameters. JobParameters is a set of parameters used to start a batch job. They can be used for identification or even as reference data during the run:

Source: Spring Batch - Chapter 3. The Domain Language of Batch

Notice we have injected a JobLauncher. It's primary job is to start our jobs. Each job will run asynchronously (this is declared in the XML configuration).

What is a JobLauncher?

JobLauncher represents a simple interface for launching a Job with a given set of JobParameters:

Source: Spring Batch - Chapter 3. The Domain Language of Batch


Batch Layer

This layer contains various helper classes to aid us in processing batch files.
  • UserFieldSetMapper - maps FieldSet result to a User object
  • RoleFieldSetMapper - maps FieldSet result to a Role object. To assign the user, an extra JDBC query is performed
  • MultiUserFieldSetMapper - maps FieldSet result to a User object; it removes semi-colon from the first token.
  • UserItemWriter - writes a User object to the database
  • RoleItemWriter - writes a Role object to the database. To assign the user, an extra JDBC query is performed


Next

In the next section, we will focus on the configuration files. Click here to proceed.
StumpleUpon DiggIt! Del.icio.us Blinklist Yahoo Furl Technorati Simpy Spurl Reddit Google I'm reading: Spring Batch Tutorial (Part 2) ~ Twitter FaceBook

Subscribe by reader Subscribe by email Share

Spring Batch Tutorial (Part 3)

Review

In the previous section, we have written and discussed the Spring Batch-related classes. In this section, we will write and declare the Spring Batch-related configuration files.


Configuration

Properties File

The spring.properties file contains the database name and CSV files that we will import. A job.commit.interval property is also specified which denotes how many records to commit per interval.


Spring Batch

To configure a Spring Batch job, we have to declare the infrastructure-related beans first. Here are the beans that needs to be declared:

  • Declare a job launcher
  • Declare a task executor to run jobs asynchronously
  • Declare a job repository for persisting job status

What is Spring Batch?

Spring Batch is a lightweight, comprehensive batch framework designed to enable the development of robust batch applications vital for the daily operations of enterprise systems. Spring Batch builds upon the productivity, POJO-based development approach, and general ease of use capabilities people have come to know from the Spring Framework, while making it easy for developers to access and leverage more advance enterprise services when necessary. Spring Batch is not a scheduling framework.

Source: Spring Batch Reference Documentation

What is a JobRepository?

JobRepository is the persistence mechanism for all of the Stereotypes mentioned above. It provides CRUD operations for JobLauncher, Job, and Step implementations.

Source: Spring Batch - Chapter 3. The Domain Language of Batch

What is a JobLauncher?

JobLauncher represents a simple interface for launching a Job with a given set of JobParameters

Source: Spring Batch - Chapter 3. The Domain Language of Batch

Here's our main configuration file:


Notice we've also declared the following beans:
  • Declare a JDBC template
  • User and Role ItemWriters

Job Anatomy

Before we start writing our jobs, let's examine first what constitutes a job.

What is a Job?

A Job is an entity that encapsulates an entire batch process. As is common with other Spring projects, a Job will be wired together via an XML configuration file

Source: Spring Batch: The Domain Language of Batch: Job

Each job contains a series of steps. For each of step, a reference to an ItemReader and an ItemWriter is also included. The reader's purpose is to read records for further processing, while the writer's purpose is to write the records (possibly in a different format).

What is a Step?

A Step is a domain object that encapsulates an independent, sequential phase of a batch job. Therefore, every Job is composed entirely of one or more steps. A Step contains all of the information necessary to define and control the actual batch processing.

Source: Spring Batch: The Domain Language of Batch: Step

Each reader typically contains the following properties
  • resource - the location of the file to be imported
  • lineMapper - the mapper to be used for mapping each line of record
  • lineTokenizer - the type of tokenizer
  • fieldSetMapper - the mapper to be used for mapping each resulting token

What is an ItemReader?

Although a simple concept, an ItemReader is the means for providing data from many different types of input. The most general examples include: Flat File, XML, Database

Source: Spring Batch: ItemReaders and ItemWriters

What is an ItemWriter?

ItemWriter is similar in functionality to an ItemReader, but with inverse operations. Resources still need to be located, opened and closed but they differ in that an ItemWriter writes out, rather than reading in.

Source: Spring Batch: ItemReaders and ItemWriters

The Jobs

As discussed in part 1, we have three jobs.

Job 1: Comma-delimited records

This job contains two steps:
  1. userLoad1 - reads user1.csv and writes the records to the database
  2. roleLoad1 - reads role1.csv and writes the records to the database
Notice userLoad1 is using DelimitedLineTokenizer and the properties to be matched are the following: username, firstName, lastName, password. Whereas, roleLoad1 is using the same tokenizer but the properties to be matched are the following: username and role.

Both steps are using their own respective FieldSetMapper: UserFieldSetMapper and RoleFieldSetMapper.

What is DelimitedLineTokenizer?

Used for files where fields in a record are separated by a delimiter. The most common delimiter is a comma, but pipes or semicolons are often used as well.

Source: Spring Batch: ItemReaders and ItemWriters


Job 2: Fixed-length records

This job contains two steps:
  1. userLoad2 - reads user2.csv and writes the records to the database
  2. roleLoad2 - reads role2.csv and writes the records to the database

Notice userLoad2 is using FixedLengthTokenizer and the properties to be matched are the following: username, firstName, lastName, password. However, instead of matching them based on a delimiter, each token is matched based on a specified length: 1-5, 6-9, 10-16, 17-25 where 1-5 represents the username and so forth. The same idea applies to roleLoad2.

What is FixedLengthTokenizer?

Used for files where fields in a record are each a 'fixed width'. The width of each field must be defined for each record type.

Source: Spring Batch: ItemReaders and ItemWriters


Job 3: Mixed records

This job contains two steps:
  1. userLoad3 - reads user3.csv and writes the records to the database
  2. roleLoad3 - reads role3.csv and writes the records to the database

Job 3 is a mixed of Job 1 and Job 2. In order to mix both, we have to set our lineMapper to PatternMatchingCompositeLineMapper.

What is PatternMatchingCompositeLineMapper?

Determines which among a list of LineTokenizers should be used on a particular line by checking against a pattern.

Source: Spring Batch: ItemReaders and ItemWriters

For the FieldSetMapper, we are using a custom implementation MultiUserFieldSetMapper which removes a semicolon from the String. See Part 2 for the class declaration.


Next

In the next section, we will run the application using Maven. Click here to proceed.
StumpleUpon DiggIt! Del.icio.us Blinklist Yahoo Furl Technorati Simpy Spurl Reddit Google I'm reading: Spring Batch Tutorial (Part 3) ~ Twitter FaceBook

Subscribe by reader Subscribe by email Share

Wednesday, February 8, 2012

Spring MVC 3.1 - Implement CRUD with Spring Data Redis (Part 1)

In this tutorial, we will create a simple CRUD application using Spring 3.1 and Redis. We will based this tutorial on a previous guide for MongoDB: Spring MVC 3.1 - Implement CRUD with Spring Data MongoDB. This means we will re-use our existing design and implement only the data layer to use Redis as our data store.


Dependencies

  • Spring core 3.1.0.RELEASE
  • Spring Data Redis 1.0.0.RC1
  • Redis (server) 2.4.7
  • See pom.xml for details

Github

To access the source code, please visit the project's Github repository (click here)

Functional Specs

Before we start, let's define our application's specs as follows:
  • A CRUD page for managing users
  • Use AJAX to avoid page refresh
  • Users have roles: either admin or regular (default)
  • Everyone can create new users and edit existing ones
  • When editing, users can only edit first name, last name, and role fields
  • A username is assumed to be unique

Here's our Use Case diagram:
[User]-(View)
[User]-(Add) 
[User]-(Edit) 
[User]-(Delete) 

Database

If you're new to Redis and coming from a SQL-background, please take some time to read the Redis Official Documentation. I would like to put emphasis on studying the Redis data types. See Data types and A fifteen minute introduction to Redis data types.

In its purest form, Redis is a key-value store that can support various data structures: Strings, Sets, Lists, Hashes, and Sorted Sets. Among these structures, we will pay extra attention to Hashes because we can use it to represent Java objects.

Hashes

Redis Hashes are maps between string fields and string values, so they are the perfect data type to represent objects (eg: A User with a number of fields like name, surname, age, and so forth):

Source: Data types

From Java to Redis

We have two Java classes representing our domain: User and Role. Here is the Class diagram:

# Cool UML Diagram
[User|id;firstName;lastName;username;password;role{bg:orange}]1--1> [Role|id;role{bg:green}]

However, Redis is a key-value store, and we can already see the model mismatch. How do we exactly map a Java class to a Redis structure? One of way of dealing with this is to use Hash structure.

Assume we have the following User object with the following properties:
User
----
id = 1
username = john
password = 12345678
role = 1

To map this object to Redis, via the command-line tool, as a Hash structure we use the command HMSET:
redis> HMSET user:1 id 1 username john password 12345678 role 1
"OK"

redis> HGETALL user:1
{"id":"1","username":"john","password":"12345678","role":"1"}

In this example, user:1 becomes the column name and the id (if we think of this in terms of a relational database). Notice we don't have to map a Role object because we've already set the value along with the user key.

Try Redis

If you need to experiment with an actual Redis instance online, visit the Try Redis.


Screenshots

Let's preview how the application will look like after it's finished. This is also a good way to clarify further the application's specs. Note: These are the same screenshots you will see from the Spring MVC 3.1 - Implement CRUD with Spring Data MongoDB guide.

The Activity diagram:

http://yuml.me/diagram/activity/(start)-%3E%3Cd1%3Eview-%3E(Show%20Records)-%3E%7Ca%7C-%3E(end),%20%3Cd1%3Eadd-%3E(Show%20Form)-%3E%7Ca%7C,%20%3Cd1%3Eedit-%3E%3Cd2%3Ehas%20selected-%3E(Show%20Form)-%3E%7Ca%7C,%20%3Cd2%3Eno%20record%20selected-%3E(Popup%20Alert)-%3E%7Ca%7C,%20%3Cd1%3Edelete-%3E%3Cd3%3Ehas%20selected-%3E(Delete%20Record)-%3E%7Ca%7C,%20%3Cd3%3Eno%20record%20selected-%3E(Popup%20Alert)-%3E%7Ca%7C.

Entry page
The entry page is the primary page that users will see. It contains a table showing user records and four buttons for adding, editing, deleting, and reloading data. All interactions will happen in this page.

Entry page

Edit existing record
When user clicks the Edit button, an Edit Record form shall appear after the table.

Edit record form

When a user submits the form, a success or failure alert should appear.

Success alert

When the operation is successful, the update record should reflect on the table.

Edited record appears on the table

Create new record
When a user clicks the New button, a Create New Record form shall appear after the table.

Create new record form

When a user submits the form, a success or failure alert should appear.

Success alert

When the operation is successful, the new record should appear on the table.

New record shows on the form

Delete record
When user clicks the Delete button, a success or failure alert should appear.

Success alert

Reload record
When user clicks the Reload button, the data on the table should be reloaded.

Errors
When user clicks the Edit or Delete button without selecting a record first, a "Select a record first!" alert should appear.

Error alert

Next

In the next section, we will study how to setup a Redis server both in Windows and Ubuntu. Click here to proceed.
StumpleUpon DiggIt! Del.icio.us Blinklist Yahoo Furl Technorati Simpy Spurl Reddit Google I'm reading: Spring MVC 3.1 - Implement CRUD with Spring Data Redis (Part 1) ~ Twitter FaceBook

Subscribe by reader Subscribe by email Share

Spring MVC 3.1 - Implement CRUD with Spring Data Redis (Part 2)

Review

In the previous section, we have laid down the functional specs of the application and studied how to map a Java object to a Redis data structure. In this section, we will study how to setup a Redis server both in Windows and Ubuntu.


Redis Setup

We will demonstrate first how to setup Redis in Windows 7, then on Ubuntu 10.04.

Windows 7

To setup a Redis server in Windows, follow these steps:

1. Open a browser and visit the Redis download section at http://redis.io/download

2. Choose the Win32/64 download. Notice it's status is Unofficial because the Redis project does not directly support win32/win64


3. Although Windows is not officially supported, there's a port available for it by Dušan Majkić. Under the Win32/64 section, click on the link A Native win32/win64 port created by Dušan Majkić.. It will bring you to a Github page.

4. Click on the Downloads section (upper-right) and you should see the following downloads.


5. Download the latest one (currently, it's 2.4.5).

6. Once the download is finished, extract the contents. Open the new folder and browse under the 32bit folder (choose 64bit if you have Windows 64bit version).


7. To run a Redis server, double-click the redis-server.exe


You should see the following console stating that Redis is now running:


To run a client interface, double-click the redis-cli.exe


And you should see the following console--waiting for your command:


Ubuntu 10.04

To setup a Redis server in Ubuntu, you will need to build it from the source. There are two ways:
  • Manual download
  • Terminal-based

Manual download

1. Open a browser and visit the Redis download section at http://redis.io/download

2. Download the latest and stable version (currently at 2.4.7).

3. Once the download is finished, extract the contents.

4. Now, let's build the source. Open a terminal and enter the following command:
/REDIS-DOWNLOAD-PATH/make


After building Redis, test it using the following command (make sure to replace REDIS-DOWNLOAD-PATH accordingly):
/REDIS-DOWNLOAD-PATH/make test


5. The binaries that are now compiled are available in the src directory. Run Redis with:
/REDIS-DOWNLOAD-PATH/src/redis-server


Terminal-based

1. Download, extract and compile Redis with:
$ wget http://redis.googlecode.com/files/redis-2.4.7.tar.gz
$ tar xzf redis-2.4.7.tar.gz
$ cd redis-2.4.7
$ make


2. The binaries that are now compiled are available in the src directory. Run Redis with:
$ src/redis-server


Note: These are the same steps you will see under the Download section at http://redis.io/download

Next

In the next section, we will discuss the project's structure and start writing the Java classes. Click here to proceed.
StumpleUpon DiggIt! Del.icio.us Blinklist Yahoo Furl Technorati Simpy Spurl Reddit Google I'm reading: Spring MVC 3.1 - Implement CRUD with Spring Data Redis (Part 2) ~ Twitter FaceBook

Subscribe by reader Subscribe by email Share